Friday 4 June 2010

Finished Lighting (NIGHT)


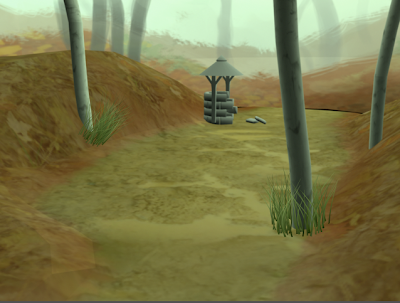
With the night lighting finished, that completes the environment. I love how these came out. I love the blue-ish ness of the dark and how the yellow earth contrasts with it. I love how the Maya Dynamic fog in the background really stands out in the dark and the noise light that has been reduced and changed in colour to white of a low glow from the moon.

I would probably have to say I prefer our scene at night than to day light. It's much deeper and calm and thick looking. The colours are also more intense.

Finished Lighting (DAYLIGHT)


This is the final outcome for our scene in daylight.

I am incredibly proud of how it came out and i feel it looks natural and stylistic. It's simple and will play a lovely background for our dragon to run around in. I love how all the textures turnt out and I love how the colours pop straight out of the scene.

Now to finish the night lighting.

Finished Show Reel

Today I finished my show reel, Using DVD Studio Pro, was lovely, it's been so nice to be able to use a simple, very visual piece of software for a change.
I included most of my work but cut a lot of it down. That way it didn't take so long to show the key things in my main reel. I used Stand Up by the prodigy for my reel music, I chose it because it is upbeat and quite complimentary to visuals, with no lyrics to distract from the video itself. I tried my best to organize my reel so that it played along side the beat, that way it could creat pacing for the reel in general.

I'm very proud of the DVD as a whole. I think the layout is clear and concise, it has a running theme and design, which i think looks quite professional. The reels themselves show my skill in all areas and I am especially proud of my Life drawing and concept reel as I feel they are my strongest areas.

GRASS!

Today I used the fur tool to create some wild grass. It was long, drawn out and complex. It has now trebled the render time and I had to readjust all my lights as the grass reacted differently to it.

...I love it.


I think, I've pretty much finished texturing the Uv's, Now its all about the lighting and finishing touches to our scene. Here are our textured UV's

I really love how the trees and mud appears on the surface. It was a long and difficult process to get to here, but well worth it. I feel ive learnt so much about texturing organically and applying bump maps subtly.

Whats even more amusing is, using lights in the scene to change the colour of your textures, for example look at the ground texture, they are similar to all leaves in autumn, but with light bursting through canopies of leaves and filtering the light to a shade of green we suddenly have a beautiful and more stylistic forest.

BLAH babbling.

update


I continued tweaking, this time adding some green in the lights, It's really looking up I feel. A tad more gloomy. I spoke to Alex again and asked about how to make it gloomier. He agreed and told me to turn down the intensity of some of the lights, but to also use Maya dynamics to add some fog. I'm taking this into consideration.

I want to make the enviroment more green I think, so It appears more lush and organic.

Today I spoke to Alex about the bump mapping and he very kindly sat with me for pretty much half the day tweaking with me! We took down the bump mapping in photoshop by tweaking the opacity of the image. The we played with more lighting using some spotlights and area lights instead of ambient lights. I adore the result however it still looks a bit dry and baron to me. I asked lydia and she agreed, something has to be done about the colours.

Alex also told me how to get the effect of light bounding through a canopy of leaves, but adding a noise effect to a spot light. I havn't included this yet, but definately will when the colours are more balanced. The best way to attack the colour i feel is through the lighting. Hopefully I'll be able to achieve some more gloom by doing this also, as the clearing is a sharper than I would want it to appear. I think this means taking down the intensity on some of the lights.

update


As you can see from these images I have been playing with the texture some more. Ive added some leaf impressions...lots of them in the UV's and some wet mud from a festival photo i had for the clearing. I think it's definately looking better... but don't get me wrong, it still looks too bumpy and rough... more tweaking to be had.


So texturing has begun, and I though i would start with the piece ive been dreading. The forest floor. I really wasn't sure how to conquer this. The surface is meant to appear bumpy and cluttered with leaves, with a nice flat muddy clearing for lydia to animate in. I thought that perhaps I could get away with UVing the ground plane and just applying the colours I wanted (see image 1). Obviously that wasn't enough so I would apply a bump map for the leaves in hope that the leaves would be formed from the reaction of the light and the colours would come through with the textured UV.

This entry is my trial and error of what happened. Yikes its messy.

1) Image 1 is the plain texture. Obviously no detail and looks very crud.
2) Images 2 shows the first attempt at bump mapping - bump is far too strong looks mental.
3) Image 3 tinkered the bump... looks slightly better, but more like the ground was made from brown crumpled paper.
4) Image 4 a little improvement, but if I lighten the bump anymore, it would literally disappear, I can seem to find a middle ground.
5) Image 5, I played with some lighting with decreases the bump a lot, still not happy.

So at the end of this little trial and error, ive learnt quite a bit about bump mapping. Still not 100% happy with this at the moment, but I think that this is because i chose the wrong method. I think i shall try playing with the lighting some more and definitely add some detail the the coloured UV

Process Sketches


For my showreel I want to show my working process. I want to show clients how I draw from start to finish. So I got Lydia to give me the ideo for a character (theme etc...) and i would knock out a quick idea from start to finish using layers to record my stages in photoshop.
She gave me a tribal woman as a theme and described a head dress for her to wear. This is what i came up with. I want to place this in my show reel, and present by having the stages appear next to each other one at a time, until you have some sort of art time line.

dvd studio pro & AE logo

Today I played with DVD studio Pro the software we are using to create our showreels. I found out that you can loop tracks back to an opening track before continuing on to the menu. This excited me, so I decided to knock up a short ident for myself in after effects. I wanted to make is simple and snappy, not too long as to bore the pants off of the viewer and annoy them completely.Here is my Ident. It's blue to fit the theme of the showreel and to keep up with continuity it also has the same font.

update


Theres some progress in the background. The bottom images is the before... the rest is the progress. I spoke to lydia and she asked for a flat surface to animate on, as it would be easier for her, instead of struggling with strange angles. She also asked for a verge at the front to signify the a blockage as to where she will animate to.

The top Image is the new layout for the scene. Which I'm quite proud of, as I think it's a nice setting with a clean layout and offers alot of depth. Below is a quick adaption with lighting to match the concept. I love how the trees react and can't wait to see it with textures.

As you can see the well has been remodeled with alot more detail. I followed the same process as the fountain from my environment project, which consists of modeling a brick, duplicating it, combining it, and using a bend deformer. This time however, as we want the well old and crumbled I deleted some of the bricks before bending.

I also learnt, by deleting the history of the well I could remove the deformers completely. mmmmm information.

Background ahoy!

Ive started work on the scene. First I started by creating some geometry for the rough floor. This was all about creating a poly plane and pulling the vertices around for some sort of wave formation. I wanted the forest floor uneven for a completely organic feel. I want a sort of "nature has claimed this" enviroment.

I then added the dragon to the scene for scaling reference and began dropping in basic shapes for other props in the environment. Fortunately I have managed to keep the props to a minimum as I want to make sure the textures look effective and work, which is going to be time consuming. I wanted to leave myself lots of time to texture as I don't believe I have ever textured anything on this scale before, and with the amount of detail on a forest floor, nervous would not be a strong enough term as to how im feeling about this scene.

DVD titles


Knocked up some title screens for each reel on my showreel. They keep with the same theme as the menus which i think keeps a nice continuity and brings the piece together.


team meeting. dropping the dragon.

Today Lydia and myself had a long discussion whilst reviewing the time scale. After finally completing her project for raveLIVE with the other dragon, lydia and I had to think seriously about whether we would have time to edit the rig to fit my dragon model and paint weights all over again.

Obviously I had enough to do what with getting the background started and completed, along with lighting, ready for the render. Lydia has to get all the animation done for the piece and fix some of the rig that was a bit shakey in her previous model. Realistically we just didn't have time. Obviously if we did, I would love to see my dragon completed, rigged and jumping around a forest, but we have little time, and thats without leaving time for error.

It is with great sadness that we agreed that the best course of action would be to drop my dragon and use the dragon modeled for lydia's raveLive project. I must admit I am disappointed but it is a necessary decision. It's whats best for this project, and relieves us of some strain from falling behind. I'm very proud of my model still, and think that the design was one of my best, I would love to continue with it in my own time.

Now I shall focus my full attention on the enviroment. Which will be the only thing of mine showcased in this project and im hoping to create something of an improvement in style and quality from my enviroment project.

wish me luck.

colour swatches

These are the colour swatches for the background. I really enjoy the green and orange on still. A good mixture of the two would eliminate the chance of loosing our dragon. How to get that balance on maya will have to be trial and error. Immediate solutions that spring to mind would be to use one of the swatches ouright and use the other color through lighting.

Background Concepts

This is the initial concept for the scene. A merky autumnal forest, with mist and and intense sunlight. After speaking to lydia about this she said she would like play with some of the colours and see what the image would look like with greens and blues instead of intense red. I agreed with her as we are having a red dragon and I am worried that if we keep this colour scheme then we will lose the dragon.

Nghiem Mail!

Finally we got a reply from Nghiem in response to the storyboards and designs we sent her. Unfortunately she cannot reply often and has to sift through all her work before se can respond to us. Lydia and myself are very grateful for the feed back and time she has given us.

Some of the important feed back which luckily came at the right time was to do with the scene itself. Where the story from our boards conveys just fine, the actual setting is off. Knuckers would not live in the mountains. They would live by streams or wells in damp places, normally located near forests.

Upon hearing this I immediately felt slightly daunted. Knowing that i have never had any experience modeling a forest and feeling slightly worried about the complexity of the textures and organic nature of the models. Pushing that aside however, I knew that I was quite capable of modeling a well as it would more or less be the same process I took to create my fountain in the environment project.

Now I'll have to look at completing some concepts, and literally jump straight in. Luckily Lydia is almost done with the animating on the musion project, so should be fully available soon.

ShowREEL menu's


I used photoshop to draw up some menus for my showreel. I wanted them to look simple, and ive decided that the theme for DVD is blue. I really like how they came out. I used the same font throughout for continuity purposes and didn't stray from the blue stripe on either menu. I decided to have contact as another menu as then the page will stay up until they click home. This gives clients time to take note of my details.

I decided to include 3 sites that I post frequently on, This shows all my web presence and accessibility online. Hopefully for future reels I'll be able to expand this list.
I also used the logos from the websites of my chose web presence. This hopefully should make them more recognizable.

Scene.

This will be the basis of our scene. The storyboards both me a lydia initially came up with were set atop a mountain with a cave and pool outside. There wood be a british landscape painted in to fill the skyline.

I really like the simplicity of this scene and of the cave. It reminds me of the flintstones. Theres not really much to write about this model as, it really is the beginning stages of the scene. Will have to talk to lydia about additional props as it looks quite bare at the moment.

Update


I have continued on with the dragon, which is almost ready for the texturing stage.

Heres how it is looking;

As you can see everything is looking fairly nice and simple. I'm really proud of this model and its form. Even though we have modified the design slightly i still believe this model looks pretty awesome. The length has had to been reduced to fit lydias new rig along with the arms and legs, but i still think it works.

The knucker now has modeled eyes and eyelids. However these hopefully wont be the final eyes, as we want cat like eyes, and the way these eyes are rigged I do not feel they would work properly with the shape of the eye.

We have also added teeth and the tail barb. Lydia also asked for a lip around the eye for some definition. This was easily added with another extrusion.

As lydia is pretty busy with her Musion project at the moment I will jump ahead with modeling the actual scene that we discussed from our storyboards.

Problem

Lydia is also creating a rigged dragon for a project to be shown using musion technology at raveLive. As this is her first time rigging it has taken a lot of time time and effort to create a very nice rig. However she would like to use this rig on our dragon also. However her other rig has different maneuverability to ours so she asked if I can change out model. Initially I was very reluctant as it changes the design. This set us back quite a bit, but I remodeled our dragons arms and legs again.

She also explained how the wings and ears would work on the rig, it meant there was no need for them to be on the primary mesh. So I got rid of them and bridged the mesh where they once were.

Heres the before and after of our mesh, where it stands at the moment.

BEFORE


AFTER

more more modeling


The modeling has again continued and now we have the basic shape for the head. granted it unattached, but thats easily resolved.

I like how it came out, simple mesh still and some nice definition for a low poly head and nice huge big eyes.

I started with a poly gube and box modeled it outwards, just like the body. I had some issues with adding additional edge loops around the eyes, however this was resolved by manually adding them with the split poly tool. The same was don't with edge loops around the mouth. The problem was that the insert edgeloops tool wasn't recognising where i wanted the edge loops, without creating 5 sided polys.

I still need to tweak the nose a bit, to give it a more beak like shape. I also have to add webbing between the ears, however after speaking with lydia, this is something that can be done during the rigging process.

Ive also started making the feet and hands. These are simple extrusions from the legs and arms. I like how they came out. They curve out wards ever so slightly, which should give a nice pulling shape when the dragon crawls.

Thursday 3 June 2010

moar modeling


As you can see modeling is coming along well, I continued shaping the start of the head, although i feel i may have to start that as a separate mesh and combine the two, as I have no idea as to how to deal with the end of the cylinder. I literally doesn't want to do Anything.

I have also pulled the legs out further, and added the other legs and began shaping them to a rather lizardy formation.

So far I am lucky enough to have not come across any problems. And even better the mesh seems to be keeping fairly low poly.

The next step is to move on to the fingers/toes, and make the head separately. I am eager to move on to the head, as i feel it is going to be the most problematic part.