Friday, 4 June 2010

Update


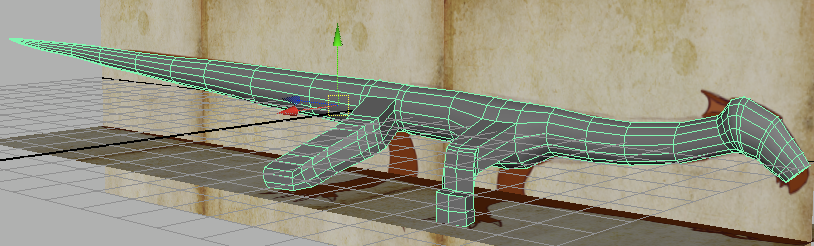
I have continued on with the dragon, which is almost ready for the texturing stage.

Heres how it is looking;

As you can see everything is looking fairly nice and simple. I'm really proud of this model and its form. Even though we have modified the design slightly i still believe this model looks pretty awesome. The length has had to been reduced to fit lydias new rig along with the arms and legs, but i still think it works.

The knucker now has modeled eyes and eyelids. However these hopefully wont be the final eyes, as we want cat like eyes, and the way these eyes are rigged I do not feel they would work properly with the shape of the eye.

We have also added teeth and the tail barb. Lydia also asked for a lip around the eye for some definition. This was easily added with another extrusion.

As lydia is pretty busy with her Musion project at the moment I will jump ahead with modeling the actual scene that we discussed from our storyboards.

Problem

Lydia is also creating a rigged dragon for a project to be shown using musion technology at raveLive. As this is her first time rigging it has taken a lot of time time and effort to create a very nice rig. However she would like to use this rig on our dragon also. However her other rig has different maneuverability to ours so she asked if I can change out model. Initially I was very reluctant as it changes the design. This set us back quite a bit, but I remodeled our dragons arms and legs again.

She also explained how the wings and ears would work on the rig, it meant there was no need for them to be on the primary mesh. So I got rid of them and bridged the mesh where they once were.

Heres the before and after of our mesh, where it stands at the moment.

BEFORE


AFTER

more more modeling


The modeling has again continued and now we have the basic shape for the head. granted it unattached, but thats easily resolved.

I like how it came out, simple mesh still and some nice definition for a low poly head and nice huge big eyes.

I started with a poly gube and box modeled it outwards, just like the body. I had some issues with adding additional edge loops around the eyes, however this was resolved by manually adding them with the split poly tool. The same was don't with edge loops around the mouth. The problem was that the insert edgeloops tool wasn't recognising where i wanted the edge loops, without creating 5 sided polys.

I still need to tweak the nose a bit, to give it a more beak like shape. I also have to add webbing between the ears, however after speaking with lydia, this is something that can be done during the rigging process.

Ive also started making the feet and hands. These are simple extrusions from the legs and arms. I like how they came out. They curve out wards ever so slightly, which should give a nice pulling shape when the dragon crawls.

Thursday, 3 June 2010

moar modeling


As you can see modeling is coming along well, I continued shaping the start of the head, although i feel i may have to start that as a separate mesh and combine the two, as I have no idea as to how to deal with the end of the cylinder. I literally doesn't want to do Anything.

I have also pulled the legs out further, and added the other legs and began shaping them to a rather lizardy formation.

So far I am lucky enough to have not come across any problems. And even better the mesh seems to be keeping fairly low poly.

The next step is to move on to the fingers/toes, and make the head separately. I am eager to move on to the head, as i feel it is going to be the most problematic part.

Modeling Begins.


Modeling on the dragon for our piece is underway. I prefer block modeling to any other method, i feel creating basic shapes and extruding helps me keep control of polys and keeps the mesh neat. This way I avoid poly's with 5 or 6 sides.

I started with a poly cylinder and turnt it on it's side, then shaped the vertices. I then started work on the legs by extruding some of the faces outwards.

As you can see Ive lengthened the design considerably as the design didn't transfer well into 3d in terms of noodlely-ness!

SHOWREEL

Also in this term I have to create a dvd Showreel of my work for the upcoming raveLIVE event. This involves using software to create a DVD with functional menus and clips of my work. To start off I need to decide what I would like to place on my showreel. So i need to have a think about how I want to sell myself and what I am proud of. What artwork to include and if I need to re-render anything.

I think the first thing I need to look at is how I would like to market myself. I believe I would like to pursue a career in concept art and character design, along with modeling. These will be two things i would like to focus on in my show reel. However I do not have too much modeling work and not many original concept work. to remedy this i would like to include my life drawing. I will also showcase my animations as although, i do not wish to specialize too much in that field, I feel they show capability in Maya and reflect my personality via the humour in my pieces. I believe this is beneficial as a showreel is a medium in which an employer can get to know a possible staff.

I now have a number of things to do and organise. I need to go through my animations and models to decide what to showcase and check if any re-rendering will need to take place, I will also need to scan all my life drawing images and convert them into a digital format and organise which images i would like to showcase from them also.

Final Design

This is the final design which i will be modeling from for our knucker dragon.

I really like the final design, simple and clean, friendly but changes swiftly to mean. I especially love his long slinky body and short lizard-like legs.

We went with the red colour scheme as it should stand out from the green backdrop we are setting our animation. I also like this colour scheme as apposed to the others, mainly because i feel red appeals to children (our target audience) more so than the brown of dark teal.

Now we have finalized a design we can now move on to creating our final model and begin rigging.